Lavender Bush Chest of Drawers

Hello lovelies! I hope you and yours are doing well. Spring is in the air here in Florida. The birds are singing and the flowers are blooming. Now if we can only delay the summer a bit longer…

As I mentioned in a prior post, Redesign With Prima recently sent me a box full of their wonderful products and of course I was like a kid in a candy store! A large part of my artistic arsenal for furniture renovations consists of Redesign products because you can’t beat the quality and the Ahhmazing design of their transfers, decoupage paper, decor moulds, stencils and really, every line they carry. I reached out to them because I truly believe and recommend their products. So I’m very excited to share this Redesign With Prima sponsored piece with you all! Spring was my inspiration for this beautiful chest of drawers. 

MATERIALS:

Here she was before.

1. Prepping

I’ve learned the hard way just how critical it is to properly prep your piece before painting. It takes time and elbow grease, but it will pay off when you see the results and durability of your paint.

I roughly sanded the sides and front of the piece by hand using 120 grit sandpaper. I used my orbital sander to sand the top down as I planned to stain it. Then I cleaned everything really well. Next I primed the front and sides of the piece.

Disclosure: Some of the links provided are affiliate links. By purchasing through these links you are supporting this blog and the work we do and there is no extra cost to you. If you would like to read our full disclosure, click HERE.

2. Decor Moulds

Decor moulds are such an easy way to enhance your pieces through detail texture. Even though this piece was in great shape and was very nice, I wanted to bring in more character and style. When I decide on the piece I’m going to renovate, I usually wait a few days so my mind can think on the vision for the design. And it will always come to me. Whether the end result varies or not, but I do like to give the creative thought process time to unfold.  I also like to visualize placement of decor moulds. Where will they look natural? Where will they enhance and not overwhelm?

I’ve used many decor moulds. My favorite to work with are Redesign with Prima decor moulds. They have an absolutely gorgeous selection and are always coming out with new designs. Their silicone moulds are thicker than other moulds I’ve used. This is important for casting because you get really good depth with your details. It also makes it much easier to de-cast
Using my casting resin, I made the Italian Villa Scrolls, the Delicate Flora and the Morocco Emblem moulds by Redesign for this piece. I like Amazing Casting Resin. I’ve tried others, but I keep going back to this one…it’s super quick to work with. This is helpful when you have to make a lot of moulds!

Scroll down to watch a video on how I cast these moulds. After the moulds dry, I apply some Quick & Thick Tite Bond and a few drops of super glue and press them on the piece. Then I secure with painters’ tape until dry. Usually after two hours they are ready for painting.

3. Painting

I went for a blended look on this piece using Dixie Belle’s Blueberry around the edges and Pink Champagne in the middle sections. I’ve created a comprehensive video of the techniques I used on this piece. I had a malfunction with my video on applying the transfer on this piece (uggh) but you can view the technique on a previous video I made where I applied a Redesign transfer on an end table.

4. Finishing

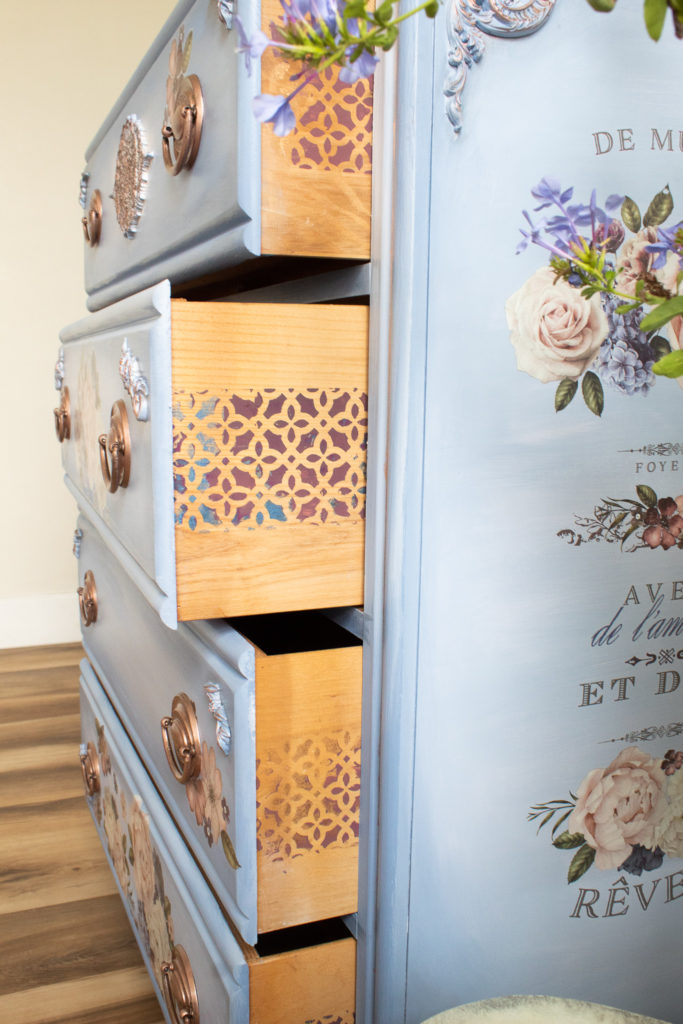
Once both coats of my paint were dried, I began adding the finishing touches to this chest of drawers. This is my favorite part—the part where it all starts to really come together and where you can get creative with the design. I carefully cut my Lavender Collection Bush Transfer according to how I wanted to place it around the piece.

Then I would eye ball the placement for each section. After slowly peeling off the protective plastic sheet, I would start rubbing and pressing with the stick tool that comes with the transfer.

I am a little neurotic about the rubbing! I go over and over and over the transfer to make sure it is adhering well. And as I peel back to reveal the transfer, I continue rubbing. Do this especially if you see any pieces not sticking to your furniture surface.

Once my transfer was on everywhere I wanted it, I took my Rose Gold Art Alchemy wax, which BTW is GORGE, and with my finger went over the surface of all my moulds. Just look at what decor wax can do to transform a mould.

Then I went around the piece with a small artist brush and defined lines using the rose gold wax. This added a nice, delicate detail. I also gave the hardware two coats of the rose gold and they came out just stunning.

The top of the piece was stained using a blended technique of both Valspar’s Briarsmoke and Old Master’s Espresso Gel Stains. The pictures to not do justice to just how beautiful the top came out, in my humble opinion!

I sealed the entire piece with General Finishes Top Coat—3 coats to the top and 1 everywhere else. After the top coat was dry, I accented corners and around mouldings ever so slightly with my Driftwood wax. Make sure you have a layer of clear wax or clear coat on your piece before using dark waxes. Otherwise you could have a mess that you can’t control on your piece! Although, you can always erase dark wax with clear wax if you get in a bind ;).

For a final detail, I stenciled all the drawer sides. I like that little element of surprise when one opens the drawers! And since Redesign came out with self-adhesive stencils, stenciling has become fool proof! I used the Calypso Lattice stencil painted with Art Alchemy Metallique Waxes and Redesign’s Cranberry Chalk Paste to create this look.

I hope you enjoyed this tutorial. I fell in love with this piece as I witnessed come together so beautifully.  The transfer, the colors, the detail…I felt really good about what was accomplished. This doesn’t always happen when I finish a piece! I’d love to hear what you think of the Lavender Bush Chest Of Drawers. This piece is now available on my Esty Shop or message me if interested.

Leave a Comment

Your email address will not be published. Required fields are marked *


The reCAPTCHA verification period has expired. Please reload the page.

nooksinbloom

•Creating Home Affordably
•Inspired by European & Grandmillenial Styles
•Medical Medium Living
🙏🏽
Blog ⬇️

Jessica
Load More Follow on Instagram
Scroll to Top

Sign Up So You Never Miss A Post!

Your information will never be shared or sold to a third party.